[dropcap]W[/dropcap]hen I think summer eats I think of a few staples. BBQ chicken, corn on the cob, salads, watermelon and heirloom tomatoes. Corn on the cob was always a childhood favorite. We used to go out to family friend’s for the 4th of July when I was little and I always remember my grandpa’s best friend, in the kitchen of camp rolling cobs of corn into this already melted butter mix that he had made in a turkey roaster type pan so you didn’t have to do anything but eat it. It was so juicy and buttery and delicious. Then every child’s nightmare comes in middle school – getting braces. You are then either forced to shave corn OFF the cob (what fun is that?!) or not eat it for two years.
As I have gotten older and wiser (therefore, pickier) with what I eat I can say corn isn’t top on my list. The number one reason is because it is a GMO (Genetically Modified Oraganism) vegetable and is very hard to find organic. (more information found here)
I have been craving it lately though and FINALLY have been able to find some organic corn the past few weeks. The other day we had some left that I wanted to cook but I wanted to do something different. I was perusing Pinterest for some inspiration and I came across a recipe (found here) for a creamy white cheddar baked corn that sounded great (link below). Like most things I find, I decided to conceptually use this idea but make a variation of it.

I remember seeing on a cooking show or reading somewhere about how boiling corn reduces a lot of the nutrition found in it. This vegetable doesn’t provide a ton of nutritional value anyway so I don’t want to reduce that further. I now cook all my corn on the cob in the oven, with the husks on. Not only does it help retain nutrients it makes peeling the husks and silk off the corn so much easier. You can put the corn right on the rack at 425 for 15-20 minutes, let it cool until it’s safe to handle and just peel it that way.
 However, since it’s summer and we were grilling, I wanted to grill my corn. I decided to only cook it in the oven for 10 minutes, peel it, and then finish it off on the grill another 10 minutes to get a nice char on the corn. But why stop there? Cheese is one of my guilty pleasures. I love a good quality cheese and it’s a splurge for me. I have stated before I try my best to eat 80% of my meal healthy and the other 20% you need room to indulge. Moderation with anything is key to have a balance. In the recipe I found they used milk in their recipe. I personally don’t use milk really for anything. I have learned to lighten up any creamy sauces by making my roux with chicken stock (you can use vegetable stock) instead of milk to save calories and fat. Greek yogurt is another source that adds creaminess to a dish but without the calories of sour cream and is a good substitute. I try to pick one thing in a dish that is my “cheat” item instead of 5. In this dish I wanted cheese to be the “item” so I saved in other ways.


I sautéed garlic, onion and bell peppers in a large skillet. I seasoned it with chili powder and cumin. Once the vegetables were soft I added in some flour to start my roux. It’s important to cook your flour for a few minutes so your sauce doesn’t taste raw. Once the flour cooked I added in my chicken broth and turned the heat up to bring it to a gentle boil which helps thicken up the sauce. I approached this sauce like I would a macaroni and cheese sauce. I have learned from making many cheese sauces a few tips that have helped my sauces come together. One being before you add your cheese take your pan off the heat. This will help prevent your sauce from separating or your cheese getting gritty. I also learned to stir your cheese in a little at a time. I did this and added in my cheese (a nice white sharp New Zealand grass fed cheddar) and the Greek yogurt.
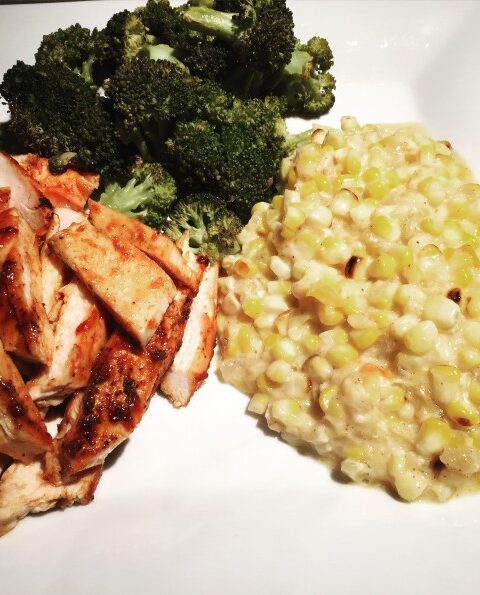
At this point I could have been done and called it complete but instead I decided to combine my cheese sauce with my corn OFF the cob and throw it in the oven for a few minutes. I topped the corn with some pepper jack cheese and put it under the broiler to melt and brown the cheese on top and make the dish nice and bubbly. You could also throw some panko bread crumbs on top as well to make it have a little crunch.
This was the perfect side dish to some BBQ chicken. It was definitely a summertime side that I would make again.

corn “mac” and cheese
- Total Time: 50 minutes
Ingredients
- 6 ears of corn left in husks (if you cannot find fresh corn you can use 6 cups of frozen corn)
- 1 bell pepper (any color) diced
- ½ white onion diced
- 4 cloves of garlic minced
- 3 TBS of “fat” (olive oil, butter, a combination of the 2)
- 1 tsp chili powder
- 1 TBS cumin
- 3 TBS flour
- 3 cups of chicken or vegetable stock
- 1 6oz container of plain Greek yogurt
- 2 cups of shredded cheese (white cheddar worked well here, pepper jack would be great as well)
Instructions
- Pre-heat oven to 425, preheat grill
- Place corn in husks directly on oven rack for 10 minutes. If you do not want to grill the corn cook all the way in the oven for 20 minutes. Take corn out and let cool until it is not too hot to handle, peel husks and silk. Place corn on grill grates and grill for 7-10 minutes rotating every few minutes until the corn gets nice and brown. Once corn is cool scrape corn off of the cob.
- In a large deep skillet sautee bell pepper, onion and garlic in olive oil or butter. Season with chili powder, cumin and salt and pepper and cook until the vegetables are soft. Sprinkle in the flour and stir to incorporate, cook for a few minutes so the flour is not raw. Add in the chicken stock and whisk to reduce flour clumps and bring the temperature up to medium high so the sauce can start to thicken. Cook for a few minutes whisking occasionally once the sauce is gently boiling.
- Remove sauce from the heat. Whisk in Greek yogurt. Add in 1/3 of the cheese and whisk, continue to add 1/3 cup at a time letting the cheese melt before adding the next round. Be sure to save a little cheese to top the corn with. In a baking dish combine sauce and corn. Top with remaining cheese and place under the broiler for 4 minutes or until the cheese is golden brown.
- Prep Time: 15
- Cook Time: 35
Nutrition
- Serving Size: 4


Pingback: summertime.....(enchilada) soup? - eat.breathe.love